Writing guide
Every building block these manuals use, shown live next to the markup that produces it. Copy from here rather than inventing a new one.
Voice and rules
- Talk to the reader as "you", in the present tense. One action per step, and say what they will see after it.
- Name screens, buttons and fields exactly as the device shows them, in the label style below.
- Keep a page to one job. A reader on a phone, sitting in the car, should always see the next action.
- No long dashes (em or en dash) anywhere: use a colon, a comma, parentheses or two sentences.
- A number that changes what the reader does goes in a table or on its own line, not in the middle of a sentence.
- Every picture has alt text that says what is on it and a caption that says what to notice.
Labels from the device screen
Wrap any button, page, field or menu name the reader will see on the device in double equals signs. Put a › between the levels of a path.
Tap Save and restart, then open Settings › WiFi and choose Station.
Keyboard keys are for a computer only, never for the device: ++ctrl+shift+r++ renders as Ctrl+Shift+R.
Step-by-step guides
A guide is an ordered list inside a steps block. The first line of a step is its title in bold. Everything else that belongs to the step (text, notes, pictures) is indented by four spaces.
-
Plug WiCAN PRO into the OBD-II port
On most cars the port is under the dashboard on the driver side. The LED lights within a few seconds.
-
Join the WiCAN access point from your phone
Open the WiFi settings on your phone and pick the network whose name starts with
WiCAN_. The password is on the quick start card.Tip
Your phone may warn that this network has no internet. Stay connected anyway.
-
Open the setup page
In a browser, go to
http://192.168.0.10. On a new device Quick Setup opens by itself.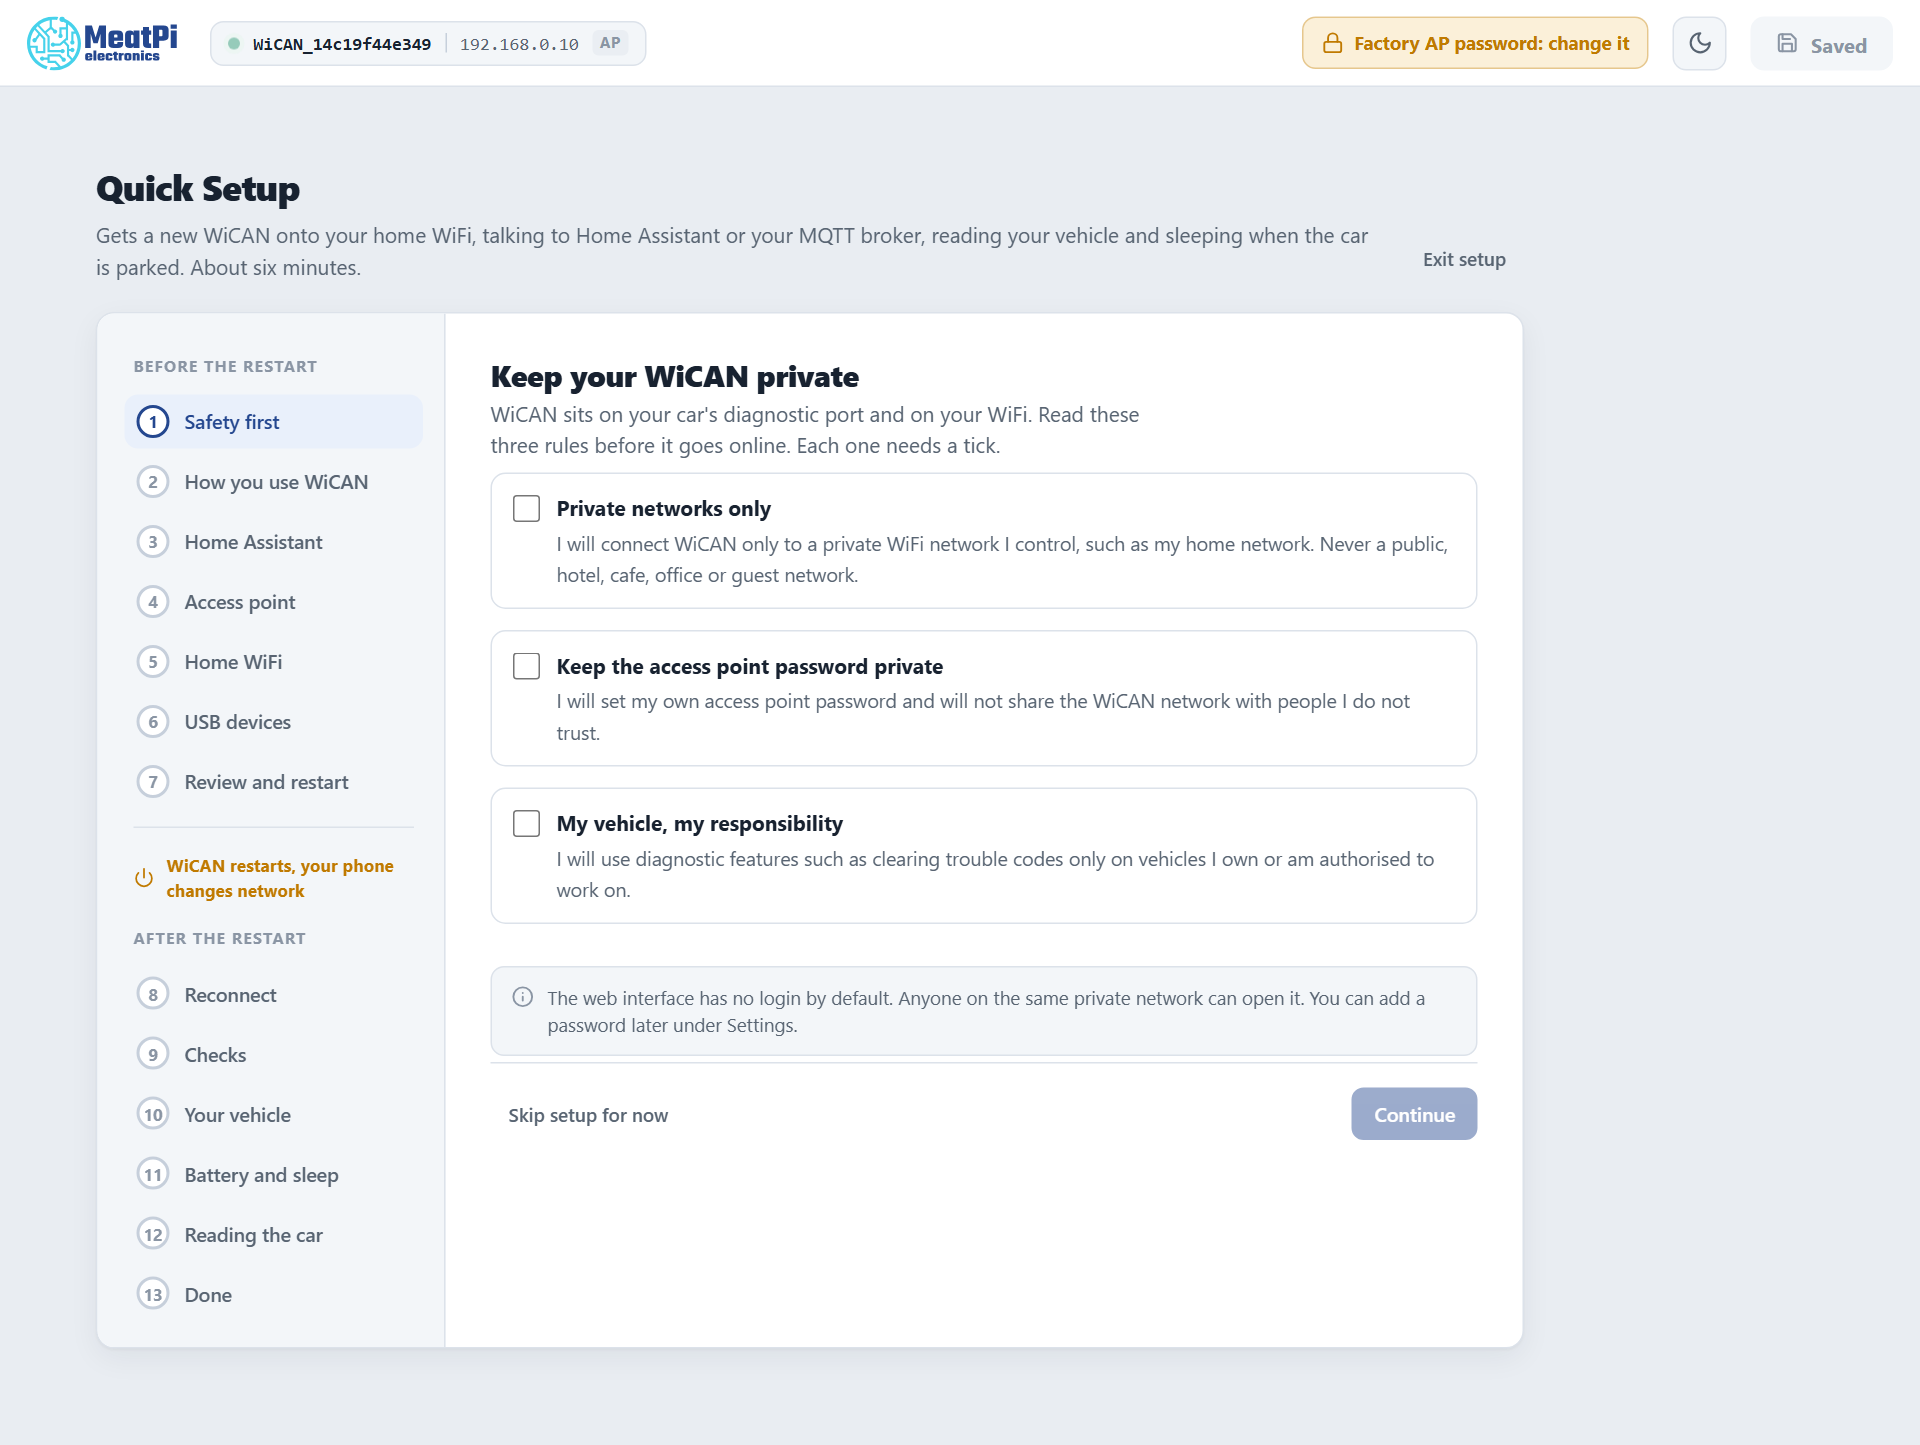
Quick Setup opens with the three safety rules. Continue stays grey until all three are ticked.
<div class="steps" markdown>
1. **Plug WiCAN PRO into the OBD-II port**
On most cars the port is under the dashboard on the driver side. The LED lights within a few seconds.
2. **Join the WiCAN access point from your phone**
Open the WiFi settings on your phone and pick the network whose name starts with `WiCAN_`.
!!! tip
Your phone may warn that this network has no internet. Stay connected anyway.
3. **Open the setup page**
In a browser, go to `http://192.168.0.10`.
<figure class="shot" markdown>
{ width="720" }
<figcaption>Quick Setup opens with the three safety rules.</figcaption>
</figure>
</div>
Keep a guide under ten steps. If it needs more, it is two guides.
Screenshots
Pictures of the device web interface are taken by a script, never by hand, so every page shows the same window size, the same theme and no personal data:
The script opens the real web interface over its mock data (no device needed), walks to each screen and writes docs/<product>/img/<set>/NN-<screen>.png. When the interface changes, run it again: the file names stay the same, so the pages do not change.
A screenshot is a figure with the shot class and a caption. Set a width so the text in the picture stays readable; readers can click any picture to enlarge it.
<figure class="shot" markdown>
{ width="640" }
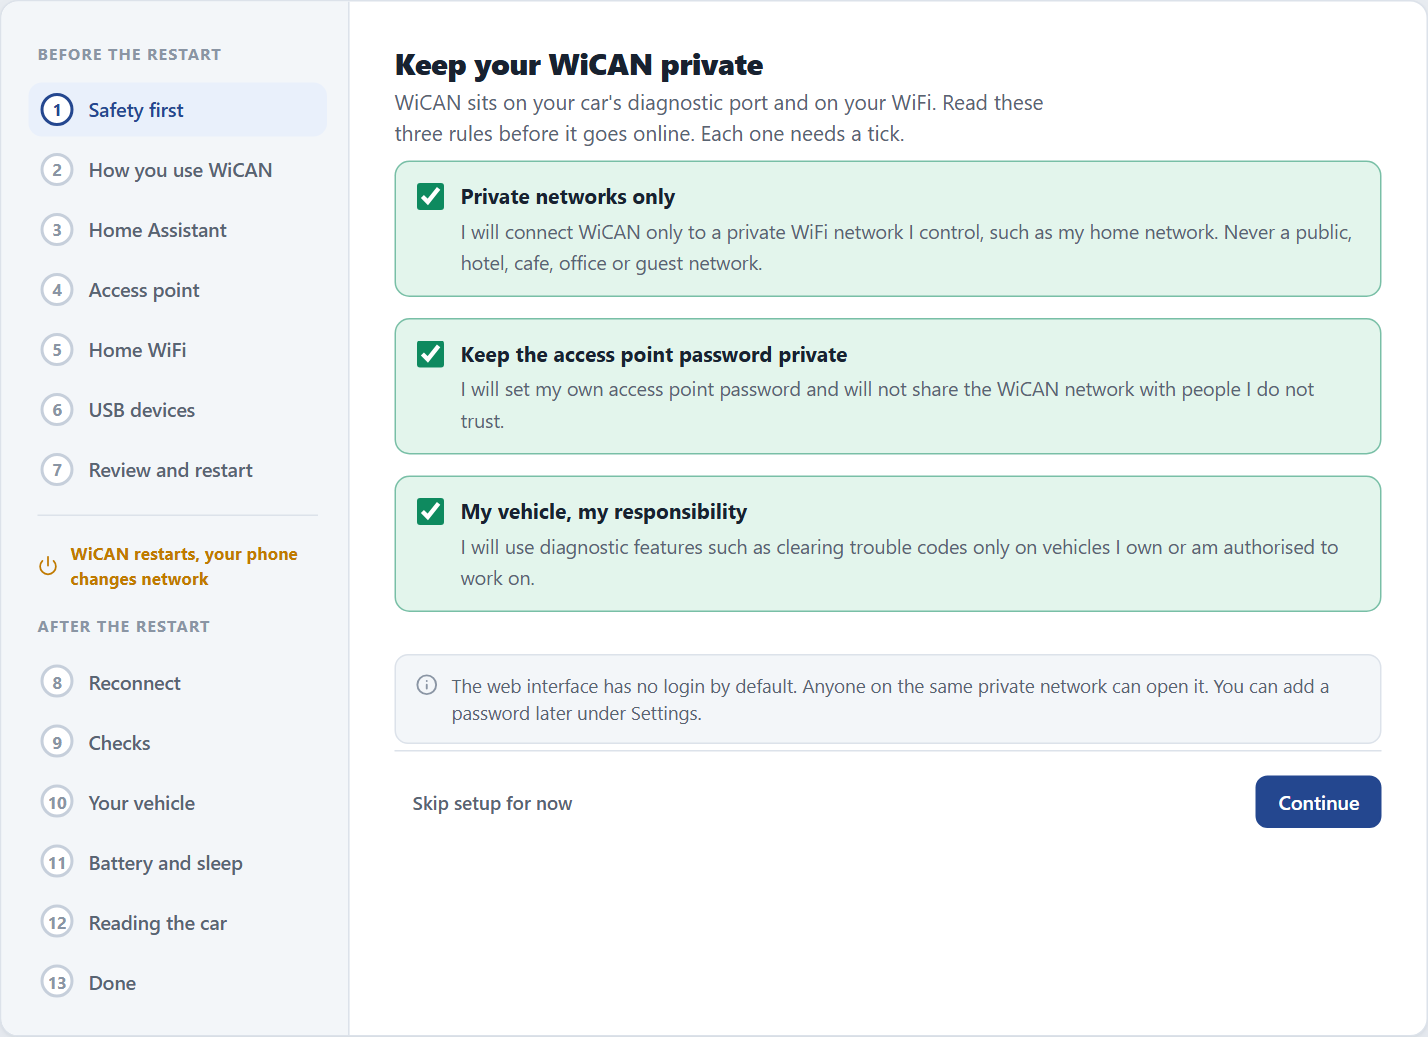
<figcaption>With the three rules ticked, Continue turns blue.</figcaption>
</figure>
A picture taken on a phone gets the shot-phone class instead, which draws a rounded phone frame around it. A picture with no caption can carry the class directly: { .shot width="480" }.
Numbered callouts on a picture
When a step talks about several parts of one screen, number them on the picture instead of describing where they are. The markers are placed in percent of the picture width and height, so they stay put at any size, and the list below uses the same numbers.
1
2
- The step list: the current step is highlighted, finished steps get a tick.
- The rules to accept before setup starts.
<div class="annotated" markdown>
{ .shot width="720" }
<i class="m" style="left:9%;top:22%">1</i>
<i class="m" style="left:52%;top:50%">2</i>
</div>
<ol class="callouts">
<li>The step list: the current step is highlighted, finished steps get a tick.</li>
<li>The rules to accept before setup starts.</li>
</ol>
Notes, tips and warnings
Use them sparingly, at most one or two per screen of text, and always with a title that says what the box is about.
Where the OBD-II port is
Most cars have it under the dashboard on the driver side, sometimes behind a small cover.
Keep the quick start card
It has the access point name and the setup address printed on it.
Driving
Set WiCAN up while parked. Never use a phone to configure it while driving.
Battery
WiCAN draws power while the engine is off. Leave sleep mode on if the car will sit for days.
Why is the access point password changed during setup?
The factory password is printed on every card, so anyone near the car could join. Quick Setup asks for a new one before anything else is saved.
!!! note "Where the OBD-II port is"
    Most cars have it under the dashboard on the driver side.

!!! tip "Keep the quick start card"
    It has the access point name and the setup address printed on it.

!!! warning "Driving"
    Set WiCAN up while parked.

!!! danger "Battery"
    WiCAN draws power while the engine is off.

??? info "Why is the access point password changed during setup?"
    A collapsed box for the curious; the guide works without it.
Different phones and computers
When a step differs by platform, use tabs. The reader picks one and the choice follows them down the page.
Open Settings › Network & internet › Internet and tap the WiCAN_ network.
Open Settings › Wi-Fi and tap the WiCAN_ network.
Click the network icon in the taskbar, then the WiCAN_ network, then Connect.
Click the Wi-Fi icon in the menu bar and pick the WiCAN_ network.
=== "Android"

    Open ==Settings== › ==Network & internet== › ==Internet== and tap the `WiCAN_` network.

=== "iPhone"

    Open ==Settings== › ==Wi-Fi== and tap the `WiCAN_` network.
LED colours
Show an LED state as a coloured dot, with blink for a blinking pattern. The names are blue, green, red, amber, cyan, purple, white and off.
| LED | Meaning |
|---|---|
| Blue | Example: the access point is up, nobody is connected |
| Green | Example: connected to your WiFi |
| Amber, blinking | Example: a firmware update is being written |
| Red | Example: something needs attention |
| Off | Example: asleep |
Pills and key facts
A pill marks a condition in passing: firmware 6.0+ tested beta removed. A guide that applies to several products starts with one pill per product.
<span class="pill">firmware 6.0+</span> <span class="pill ok">tested</span> <span class="pill warn">beta</span>
A key facts block sums up a product or a feature at the top of its landing page.
- Access point
WiCAN_followed by the device address, password on the card- Setup address
http://192.168.0.10- Needs
- A phone or laptop with WiFi and a browser
<dl class="facts" markdown>
<dt>Access point</dt><dd>`WiCAN_` followed by the device address, password on the card</dd>
<dt>Setup address</dt><dd>`http://192.168.0.10`</dd>
</dl>
Tables, code and addresses
Tables carry settings and their meaning, one row per setting, the default marked. An address, a file name or a value the reader types goes in inline code. Something the reader runs on a computer goes in a code block with a copy button:
| Setting | Default | What it does |
|---|---|---|
| Sleep mode | Off | Puts WiCAN to sleep when the car is off |
| Sleep voltage | 13.1 V | The battery voltage below which sleep starts |
| Wake on motion | Off | Wakes WiCAN when the car moves |
Files and names
- Pages: lowercase with hyphens, grouped by product and section, for example
wican-pro/getting-started/quick-setup.md. - Sections inside a product manual, in this order:
getting-started,connectivity,vehicle-data,integrations,tools,power,firmware,troubleshooting. - Pictures:
docs/<product>/img/<page>/NN-<screen>.png, numbered in the order they appear. - Product photos for the cards on the home page:
docs/assets/products/<product>.jpg, 1600 x 900 on a white background. - A guide that applies to every product lives under
integrations/and names its products with pills at the top.